How To Dig Steps Into A Hill [5 Easy Steps!]
Want to know how to dig steps into a hill, the RIGHT way? Here is a quick and easy guide, so you can finally have the garden of your dreams!
Garden steps built into an earth slope can be made out of a number of materials, including bricks, concrete slabs, timber, gravel, and concrete, as well as large flat stones.
The type of material utilized, as well as the degree and length of the slope, all influence the design.
A slope or hill may provide a lawn or garden character while also giving planting alternatives.
Slopes can also be unpleasant since they require more effort to climb and descend, they also might be dangerous. So, steps might be a good choice.
On a slope, there are various stair choices. Individual stairs can be constructed from huge flagstones, limestone slabs, natural or quarried rock set in sand or mortar, or more formal brick steps.
For all materials, the fundamental stage building is the same.
Cutting steps into a dirt slope to make a stairway may be a fantastic landscaping technique. Outdoor stairways also make it easier and safer to stroll up slopes.
You can build such a pathway in as little as an afternoon with a few simple tools and some planning.
STEP 1: determine the total height of the slope.
STEP 2: Pick the materials
STEP 3: Mark out the stairway you want to excavate with your measuring tape
STEP 4: Use a spade to prepare the ground at each step
STEP 5: Construct the next riser on the back edge of the first tread.
Related Articles:
- What To Do With A Tree Stump In The Front Yard [Weird + Wonderful Ideas!]
- How To Treat Untreated Wood For Outdoor Use [2022 Guide]
- Clear Shrubs And Trees With The 5 Best Hand Saw For Cutting Trees [2022 Guide]
- Best Cordless Grass Shears For A Clear Working Space [2022 Update]
DISCLAIMER
Some of the links on here are affiliate links and I may earn if you click on them, AT NO EXTRA cost to you. Hope you find the information here useful! Thanks.
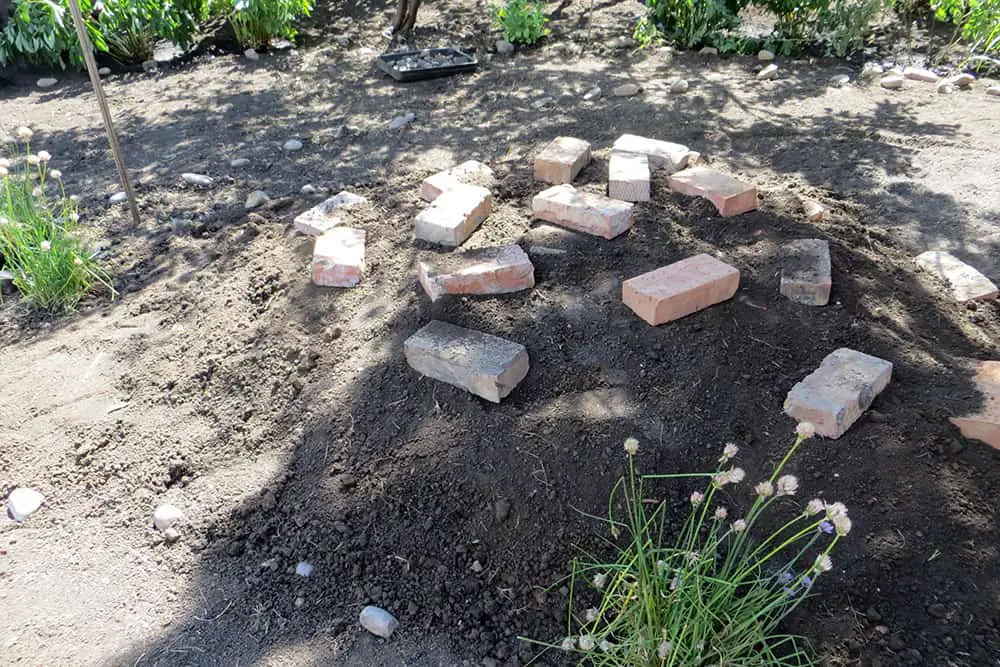
How To Dig Steps Into A Hill
1. Planning
Before you begin constructing your steps, determine the total height of the slope.
With a tape measure, measure the distance from the bottom of the slope to the top of the hill. Make sure the tape measure is flat on the ground before collecting measurements.

Choose the number of steps you wish to take next.
A typical step in the United States is 7 34 inches tall.
The height of your slope is divided by 7 34 inches (or whatever many inches tall you’ve chosen to make the ascent of your steps).
You’ll need 10 steps if your slope is 77.5 inches tall and you want to make stairs that are 7 34 inches tall.
You’ll also need to figure out the breadth of each step to make sure you have enough supplies.
A typical step in the United States is 11 inches broad. Most people will have enough of an area to rest their feet as they walk up the stairs because of this.
If you want to stick to this rule, you’ll need to cut at least 11 inches horizontally at each stage in your slope.
Insert stakes into the ground on both sides of the route you intend to create at the bottom and top to assist guide you as you build your stairs. Run each lower post up the hill with a string tied around it.
Attach the threads to the higher set of posts from there. When you start digging out your stairs, use this stairway outline as a reference.
2. Materials
When it comes to the materials for your staircase, you have a lot of options.
Your choice will be influenced by the cost of the materials, your preferred aesthetic, and the environment in which you live.
If you reside in a region where the winters are harsh, you should avoid using stone steps since they might be slippery.
For your steps, you may use large, flat stones or wooden planks.
Having some type of tread, such as these, rather than merely plain dirt, is beneficial. You may also use wood as a retaining wall to keep your dirt stairs from eroding.
Use tile saws to speed up the process of cutting stones and hard material

Large retaining boards or vertical barriers against the rise of your stairs, for example, may help your stairway last longer.
At the bottom of your slope, when digging, shovel horizontally into the ground to create a level surface. It could be necessary to first remove any grass, weeds, or loose topsoil.
As a general rule, you should dig down far enough so that the soil is compacted and hard.
Note- Here are beautiful garden stepping stones, to help you build stylish steps!
3. Digging Your Steps
Step 1
Mark out the stairway you want to excavate with your measuring tape, then place posts or boards at the borders of the shape.
Always start at the bottom of the hill when shovelling. When digging, shovel horizontally into the dirt at the foot of your slope to create a level surface.
Use a quality digging hoe is it will make the job much easier and pleasant when you have the right tools for the job!

Grass, weeds, and loose dirt may need to be removed first. You should dig deep enough so that the earth is compacted and solid. As you continue, use a level to check that each step is flat.
Step 2
Set a spirit level on one end of a length of lumber on the top of the hill to measure the height difference between the levels.
Have a buddy maintain the timber level while you measure the height of the timber above the lower ground level.

Measure halfway down the slope, then from there to the lowest level, if the timber won’t go all the way down the hill.
Add the two heights together to obtain the overall fall.
Using the height and length data, calculate an acceptable size for treads and risers. String lines should be used to mark the front edge of each step. Using a builder’s square, make sure they’re evenly spaced and at right angles to the long lines.
Step 3
Use a spade to prepare the ground at each step.
To guarantee that you always have a flat area to work on, start at the bottom. Dig a 125mm deep hole at the base of the flight to provide a footing strip for the first riser.

Place about 25mm of roadbase in the trench’s base and firmly compact it. Fill the trench with concrete, tamp it level with the earth, and cover it with polythene sheeting.
Paving slabs are used to create the initial tread’s surface. Use a full bed of mortar and project the slab about 25mm in front of the riser to create a nosing. Make a little fall towards the front of the slab to allow water to run off.
Step 4
Construct the next riser on the back edge of the first tread.
Make sure the riser is level, and compensate for the tread’s slight drainage slope with the mortar layer. Make sure the top tread is parallel to the ground.
If required, slant the ground towards the tread or gently raise the tread – no more than 15mm. Fill up the spaces between the tread slabs with cement or fine sand. Use cement or fine sand to fill in the gaps between the tread slabs. Allow around 24 hours for the mortar to cure before using the steps if you’re using mortar.
Transport your slabs and sand with a quality wheelbarrow!

Well, there you have it. how to dig steps into a hill so you can have a functional, visually pleasing garden that is also safe!
If you want more information, you can see the video,we found it for you below!
FAQs
How Can You Construct A Ladder On A Slope?
Step 1
Decide how many steps you would want on your outdoor stairs.
Step 2
Set concrete beneath the crossbar and fill the gap behind with more concrete.
Step 3
Make sure the tracks are level and appear as flat surface or spirit level.
Step 4
You should be able to advance and repeat the process for subsequent levels once your first step is deep enough. Continue to build stairs to your required step width and you will have your ladder ready!
How Do You Build Stairs On A Steep Slope?
Building stairs as your DIY projects is relatively simple.
The ascent and run from the ramp should be measured in inches, both in a vertical distance and horizontal distance.
To get the necessary number of steps, multiply the slope by 6 inches, and rounded up.
Takeaway
Learning how to dig steps into a hill is simple – just take your time and complete each step one at a time, pun intended! Having outdoor steps elevates the look of your home and it is understandable why many are interested in this home improvement project.
Get the materials ready, remove grass, pack in some additional soil, and have your desired steps up a few inches and you are good to go!


![Why Is My Bamboo Turning Yellow? [And How To Fix It!]](https://aboveandbeyondgardening.com/wp-content/uploads/2021/10/Why-Is-My-Bamboo-Turning-Yellow-768x512.jpg)