
What Do Rose Seeds Look Like? [+Harvesting Tips!]
Are you wondering, What Do Rose Seeds Look Like? Here is a quick and easy guide on what they look like and how to harvest them properly!
Roses are beautiful flowers. Their various colours and sweet smells can brighten up your garden. Roses may look great, but growing them is a difficult task, especially if you plan on doing so by planting seeds.
Using a cutting is a faster way to grow roses, but using seeds has an advantage, as you can plant as many different types as you want. To do this, you’ll have to know what rose seeds look like.
Place your cutting in propagation test tubes for better storage and good root development!

If you’re wondering what the answer is, keep reading, as we’ll cover the answer in this article. We’ll also cover how to extract and prepare your rose seeds for planting.
Use organic, Non-GMO edible flower seeds for healthy lushes flowers!

Related Articles:
- How To Harvest Rosemary [The RIGHT Way!]
- Best Seed Starting Kit Of 2022
- How To Harvest Basil Seeds- The RIGHT Way!
- How To Harvest Romaine Lettuce [2022 Update]
- When To Mow After Overseeding 2022
- How To Save Pumpkin Seeds For Planting
DISCLAIMER
Some of the links on here are affiliate links and I may earn if you click on them, AT NO EXTRA cost to you. Hope you find the information here useful! Thanks.
What Do Rose Seeds Look Like?
Several types of roses produce seeds, but at first glance, it’s hard to judge where the seeds grow.
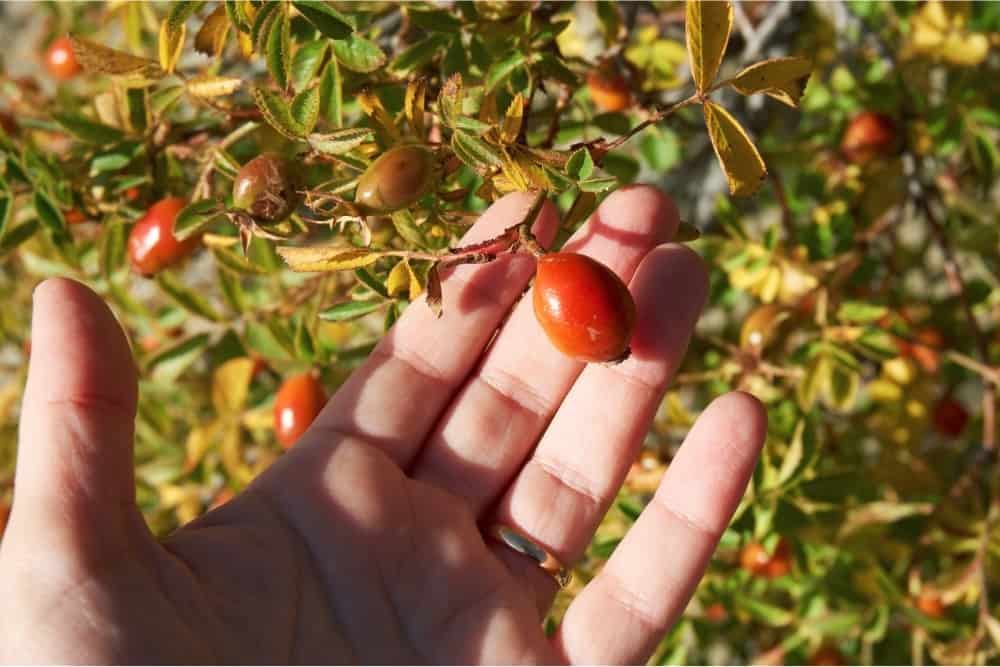
Rose seeds grow in rose hips, which are growths at the base of a bloom. Rose hips look like little seed balls on the tips of stems. These occur once the flower starts to perish.
Harvesting these seeds involves letting your rose bush die. You have to let this process happen naturally. Pruning your bush as the petals die will prevent the hips from growing.
Rose hips normally develop at the end of summer or the beginning of fall. They’re normally red, orange, or yellow, but they’re ideally harvested when they’re orange or red.
If your rose hips are brown, snip these off of your bush. These are rose hips that have been left for too long, and won’t have any seeds in them.
Increase your rate of seed germination by using a seed germination kit. Provide the perfect condition for higher seed germination rate!

Collecting Rose Seeds
It’s important to ensure that your rose seeds are of good quality. Fewer quality seeds will result in less impressive flowers. There are a few ways to get good-quality rose seeds.
Purchasing from a nursery is a good way to find first-rate rose seeds, but you won’t know if you’ll like the roses themselves. If you already have a rose bush, these seeds could infect your current rose collection.
By ordering online, you can find various types of rose seeds. However, this isn’t recommended, as you can’t ensure that your seeds are of good quality or free from diseases. You should only buy online if there are no other ways for you to find rose seeds.
The best way to find rose seeds is to collect them yourself. This is time-consuming, but it’s the only way to make sure that you’re adding trusted seeds to your garden.
Note– If you want to make your green fingers happier and your life easier, you can use this affordable 83 pieces ultimate gardening set to help you garden like a pro!

Cleaning And Seeding Rose Hips
Rose hips are best collected in the fall. Use tweezers or a pair of clean, sharp scissors to harvest them. Before you begin, place your rose hips in individually labeled containers. This is important so that you know what species of roses you are working with.
Collect your rose hips with quality pruners for quick and clean cuts!

After you have your rose hips, use a knife to cut them in half. Extract the seeds and place them in named containers. After you have removed the seeds, you’ll need to rinse any residual pulp off of them.
Add a couple of drops of bleach to some water, then wash the seeds in this mixture. This will also get rid of fungus and harmful bacteria. Rinse the seeds again with tap water to remove the bleach, then leave them to dry.
Once the seeds have dried, keep them in an airtight jar. Always keep your jar in a cool and dry environment. You can keep your seeds stored away for a while, or you can begin planting them immediately.
Preparing Rose Seeds
Before you start creating your rosebed, it’s important to prepare your seeds.
Testing Seeds
It’s best to test your seeds right after you extract them from the rose hips. This involves checking which ones are safe to plant. Once you’ve collected your seeds and placed them into the bleach water mixture, all of the seeds will sink to the bottom.
Leave the seeds in the mixture for 24 hours. After this time, you may see some seeds that start to float upwards. These seeds have either been infected with fungus, or they haven’t developed enough. Remove these seeds from the water and dispose of them.
Cleaning Seeds
You can clean your rose seeds using a bleach-water solution, but if you want to make sure that they’re completely clean, add a small amount of peroxide to kill any residual fungus. This is a great method, but you still need to further clean your seeds.
After the seeds are taken, any pulp from the rose hips might stick to them. This pulp can house bacteria or cause fungal infections later down the line.
To get rid of the pulp, use a brush to thoroughly scrub the seeds, making sure that any residue is gone. After you’ve done this, rinse the seeds with a bleach or peroxide solution. Rinse them again with water, then leave to dry.
Cold Temperature Treatment
Rose seeds can take a long time to germinate, but you can speed up this process by placing the seeds in a cold environment. Seeds sprout faster in the cold, so you can keep them in a fridge that’s set to a low temperature.
Before you do this, gather a few plastic bags and label them with the different names of your roses. Sort through your seeds, then place them inside a damp paper towel. Put these towels inside the plastic bags, seal them, then leave them in the fridge.
The fridge’s temperature must be as low as 33°F. Keep the seeds in the fridge for 4 to 6 weeks. Check on them regularly, as some rose types may sprout inside the fridge. If the towel starts to dry up, add a little water to keep it moist.
Planting Rose Seeds
Depending on the type of rose seeds you have, some species may take longer than 6 weeks to germinate. Once your seeds are ready, plant them in small pots or trays that are 3 inches or shorter.
Don’t mix your rose seeds, use separate pots for each species. Label them with the species, the date you planted them, and the date of harvesting. Before you plant them in the soil, lightly dust the seeds to avoid mold or fungus growth.
Plant the seeds around a quarter-inch within the soil. Water immediately, ensuring that the soil is damp until leaves start to appear.
Transplanting Rose Seeds
Leaves usually start appearing after 6 weeks, but don’t move the plant just yet. Wait for 3 to 4 leaves to grow, then transplant it to a larger pot. Keep monitoring the seedlings, looking out for poor growth, disease, or lack of color. Get rid of any ones that aren’t up to standard.
The first bloom should start growing after a year. If your bush grows too much, you can move it to a bigger pot with the same soil mixture. In most cases, a rose bush needs 3 years to fully grow.
The Bottom Line
Roses take a lot of time to grow, but with regular maintenance, you’ll have a blossoming rose garden that you can be proud of. There are many different varieties of roses to choose from, but make sure that you harvest your seeds at the right time, or they won’t bloom as well.
Well, there you have it, all the answers to your question, What Do Rose Seeds Look Like? Hopefully that helped but if you want more info, we found you a video below!
![How To Harvest Oregano Without Killing The Plant? [Personal Experience!]](https://aboveandbeyondgardening.com/wp-content/uploads/2022/10/How-To-Harvest-Oregano-Without-Killing-The-Plant-7-768x442.jpg)
![How To Harvest Swiss Chard Without Killing The Plant [Exact Steps!]](https://aboveandbeyondgardening.com/wp-content/uploads/2022/10/how-to-harvest-swiss-chard-without-killing-the-plant-768x512.jpg)
![How To Keep Foxes Away From Chickens [Practical Solutions!]](https://aboveandbeyondgardening.com/wp-content/uploads/2021/10/How-To-Keep-Foxes-Away-From-Chickens--768x511.jpg)
![How To Grow Campari Tomatoes From Scratch [A Complete Guide]](https://aboveandbeyondgardening.com/wp-content/uploads/2022/08/How-To-Grow-Campari-Tomatoes-7-768x512.jpg)
![What Do Plants Need To Grow And Survive? [2022 Guide!]](https://aboveandbeyondgardening.com/wp-content/uploads/2021/10/What-Do-Plants-Need-To-Grow-And-Survive-768x508.jpg)